Setup proxmox-csi-driver in K3S Kubernetes Cluster using FluxCD

Table of Contents
Currently, I have small, two-node sandbox k3s cluster on my Proxmox homeserver. It is great for testing new things in Kubernetes ecosystem, but currently i’m missing one thing that is pretty awesome on “real” cloud environments with managed Kubernetes services - additional persistent volumes.
Of course, I can use local-path to get persistent storage in my cluster, but it would be cool to attach separate virtual disks per pod. That’s when i found proxmox-csi-driver.
Proxmox-csi-driver is developed by Serge Logvinov. It is a opensource CSI driver for Proxmox, you can find it on GitHub
Create proxmox user for driver⌗
First, login to your Proxmox host via SSH or using WebUI Console, and create seperate user that we will utilize for interacting from Kubernetes
root@ashe:~# pveum role add CSI -privs "VM.Audit VM.Config.Disk Datastore.Allocate Datastore.AllocateSpace Datastore.Audit"
root@ashe:~# pveum user add kubernetes-csi@pve
root@ashe:~# pveum aclmod / -user kubernetes-csi@pve -role CSI
root@ashe:~# pveum user token add kubernetes-csi@pve csi -privsep 0
┌──────────────┬──────────────────────────────────────┐
│ key          │ value                                │
╞══════════════╪══════════════════════════════════════╡
│ full-tokenid │ kubernetes-csi@pve!csi               │
├──────────────┼──────────────────────────────────────┤
│ info         │ {"privsep":"0"}                      │
├──────────────┼──────────────────────────────────────┤
│ value        │ 1d22d441-2115-4dx4-9e43-144c1ssdd12e │
└──────────────┴──────────────────────────────────────┘
Save the secret token for later. Also make sure, that your Kubernetes nodes have ‘VirtIO SCSI Single’ as their SCSI Controllers.
Label kubernetes nodes⌗
For driver to work correctly (attach disks to appropriate k8s node), we need to add labels
topology.kubernetes.io/region can be arbitrary, but it needs to match with config, i will use default Region-1
topology.kubernetes.io/zone should be set to Proxmox node name
Author suggest utilizing his another tool https://github.com/sergelogvinov/proxmox-cloud-controller-manager, but currently, I will just add labels with the non-automatic way
➜  k label node/homelab-k3s-1 topology.kubernetes.io/region=Region-1
node/homelab-k3s-1 labeled
➜  k label node/homelab-k3s-2 topology.kubernetes.io/region=Region-1
node/homelab-k3s-2 labeled
➜  k label node/homelab-k3s-1 topology.kubernetes.io/zone=ashe
node/homelab-k3s-1 labeled
➜  k label node/homelab-k3s-2 topology.kubernetes.io/zone=ashe
node/homelab-k3s-2 labeled
I also noticed that kubernetes.io/hostname=homelab-k3s-1 should match VM name at Proxmox, despite setting the .spec.ProviderID
Install using FluxCD⌗
I will install proxmox-csi-driver using Helm Chart by FluxCD HelmRelease. We will also create a separate namespace for the driver, so it could run as a privileged user.
The proxmox-csi-driver README also explains deploying the driver using plain Kubernetes manifest, Helm and Talos if that’s more your thing
Note: this is an example of HelmRelease and depends on your repository layout you probably should put that HR in seperate Kustomization
apiVersion: source.toolkit.fluxcd.io/v1beta2
kind: HelmRepository
metadata:
  name: sergelogvinov
  namespace: flux-system
spec:
  interval: 10m
  type: oci
  url: oci://ghcr.io/sergelogvinov/charts
---
apiVersion: v1
kind: Namespace
metadata:
  name: proxmox-csi
  labels:
    kustomize.toolkit.fluxcd.io/prune: disabled
    pod-security.kubernetes.io/enforce: privileged
---
apiVersion: helm.toolkit.fluxcd.io/v2beta2
kind: HelmRelease
metadata:
  name: proxmox-csi
  namespace: proxmox-csi
spec:
  interval: 30m
  chart:
    spec:
      chart: proxmox-csi-plugin
      sourceRef:
        kind: HelmRepository
        name: sergelogvinov
        namespace: flux-system
  maxHistory: 2
  install:
    createNamespace: true
    remediation:
      retries: 3
  upgrade:
    cleanupOnFail: true
    remediation:
      retries: 3
  uninstall:
    keepHistory: false
  values:
    config:
      clusters:
        - url: https://ashe.issei.space:8006/api2/json
          insecure: false # if you have self-signed SSL certificate, change it to true
          token_id: "kubernetes-csi@pve!csi"
          token_secret: "${PROXMOX_KUBERNETES_CSI_SECRET:=notset}"
          region: Region-1
    storageClass:
      - name: proxmox-data-xfs
        storage: nvme # Storage name at proxmox
        reclaimPolicy: Delete
        fstype: xfs
I also did use Flux substitute (PROXMOX_KUBERNETES_CSI_SECRET), so before pushing the changes to repo I made sure that secret we generated before was deployed in Flux cluster secrets
After pushing the changes to git, we can check if the Helm was deployed successfully
➜  ~ flux get ks -A
NAMESPACE  	NAME                                   	REVISION              	SUSPENDED	READY	MESSAGE
[...]
flux-system	cluster-apps-proxmox-csi               	main@sha1:3f0676cf    	False    	True 	Applied revision: main@sha1:3f0676cf
[...]
➜  ~ flux get hr -n proxmox-csi
NAME       	REVISION	SUSPENDED	READY	MESSAGE
proxmox-csi	0.1.15  	False    	True 	Helm upgrade succeeded for release proxmox-csi/proxmox-csi.v8 with chart proxmox-csi-plugin@0.1.15
➜  ~ kubectl get pods -n proxmox-csi
NAME                                                        READY   STATUS    RESTARTS      AGE
proxmox-csi-proxmox-csi-plugin-controller-bd748957b-g2nxc   5/5     Running   5 (17m ago)   19m
proxmox-csi-proxmox-csi-plugin-node-9v4x8                   3/3     Running   3 (17m ago)   60m
proxmox-csi-proxmox-csi-plugin-node-gnn24                   3/3     Running   3 (18m ago)   60m
➜  ~ k get storageclass
NAME               PROVISIONER                            RECLAIMPOLICY   VOLUMEBINDINGMODE      ALLOWVOLUMEEXPANSION   AGE
local-path         cluster.local/local-path-provisioner   Delete          WaitForFirstConsumer   true                   19d
proxmox-data-xfs   csi.proxmox.sinextra.dev               Delete          WaitForFirstConsumer   true                   34m
Test⌗
For testing, I will deploy StatefulSet
apiVersion: apps/v1
kind: StatefulSet
metadata:
  name: test
  namespace: default
  labels:
    app: alpine
spec:
  podManagementPolicy: Parallel  # default is OrderedReady
  serviceName: test
  replicas: 1
  template:
    metadata:
      labels:
        app: alpine
    spec:
      terminationGracePeriodSeconds: 3
      containers:
        - name: alpine
          image: alpine
          command: ["sleep","1d"]
          securityContext:
            seccompProfile:
              type: RuntimeDefault
            capabilities:
              drop: ["ALL"]
          volumeMounts:
            - name: storage
              mountPath: /mnt
  updateStrategy:
    type: RollingUpdate
  selector:
    matchLabels:
      app: alpine
  volumeClaimTemplates:
    - metadata:
        name: storage
      spec:
        accessModes: ["ReadWriteOnce"]
        resources:
          requests:
            storage: 2Gi
        storageClassName: proxmox-data-xfs
Make sure that storageClassName matches the one we set earlier.
➜  ~ k get pods
NAME                        READY   STATUS    RESTARTS      AGE
test-0                      1/1     Running   0             3m24s
Let’s start a shell in our new pod
➜  ~ k exec -it pod/test-0 ash
kubectl exec [POD] [COMMAND] is DEPRECATED and will be removed in a future version. Use kubectl exec [POD] -- [COMMAND] instead.
/ # df -h
Filesystem                Size      Used Available Use% Mounted on
overlay                  14.6G      4.1G      9.8G  30% /
tmpfs                    64.0M         0     64.0M   0% /dev
/dev/sdb                  1.9G     46.1M      1.9G   2% /mnt
/dev/vda1                14.6G      4.1G      9.8G  30% /etc/hosts
/dev/vda1                14.6G      4.1G      9.8G  30% /dev/termination-log
/dev/vda1                14.6G      4.1G      9.8G  30% /etc/hostname
/dev/vda1                14.6G      4.1G      9.8G  30% /etc/resolv.conf
shm                      64.0M         0     64.0M   0% /dev/shm
tmpfs                     1.9G     12.0K      1.9G   0% /run/secrets/kubernetes.io/serviceaccount
tmpfs                   985.5M         0    985.5M   0% /proc/acpi
tmpfs                    64.0M         0     64.0M   0% /proc/kcore
tmpfs                    64.0M         0     64.0M   0% /proc/keys
tmpfs                    64.0M         0     64.0M   0% /proc/timer_list
tmpfs                    64.0M         0     64.0M   0% /proc/sched_debug
tmpfs                   985.5M         0    985.5M   0% /sys/firmware
As we can see, we have /mnt mounted, let’s now create a file
/ # cd /mnt
/mnt # ls
/mnt # echo $(date) > test-file
/mnt # cat test-file
Tue Jan 16 20:12:16 UTC 2024
/mnt # exit
Now let’s exit the pod, delete it, wait for recreate, and check if the file is still there
➜  ~ k delete pod/test-0
pod "test-0" deleted
➜  ~ k get pods
NAME                        READY   STATUS              RESTARTS      AGE
test-0                      0/1     ContainerCreating   0             5s
➜  ~ k get pods
NAME                        READY   STATUS    RESTARTS      AGE
test-0                      1/1     Running   0             13s
➜  ~ k exec -it pod/test-0 ash
kubectl exec [POD] [COMMAND] is DEPRECATED and will be removed in a future version. Use kubectl exec [POD] -- [COMMAND] instead.
/ # cd /mnt
/mnt # ls -la
total 8
drwxr-xr-x    2 root     root            23 Jan 16 20:12 .
drwxr-xr-x    1 root     root          4096 Jan 16 20:12 ..
-rw-r--r--    1 root     root            29 Jan 16 20:12 test-file
/mnt # cat test-file
Tue Jan 16 20:12:16 UTC 2024
Bingo! The file is still there. We can also check storage class of our Persistent Volume Claim (PVC) to be sure
➜  ~ k get pvc
NAME             STATUS   VOLUME                                     CAPACITY   ACCESS MODES   STORAGECLASS       AGE
storage-test-0   Bound    pvc-08fa4889-3749-40a3-85cb-ddf273d9ac21   2Gi        RWO            proxmox-data-xfs   7m11s
In Proxmox WebUI we can also see that additional virtual disk was also attached
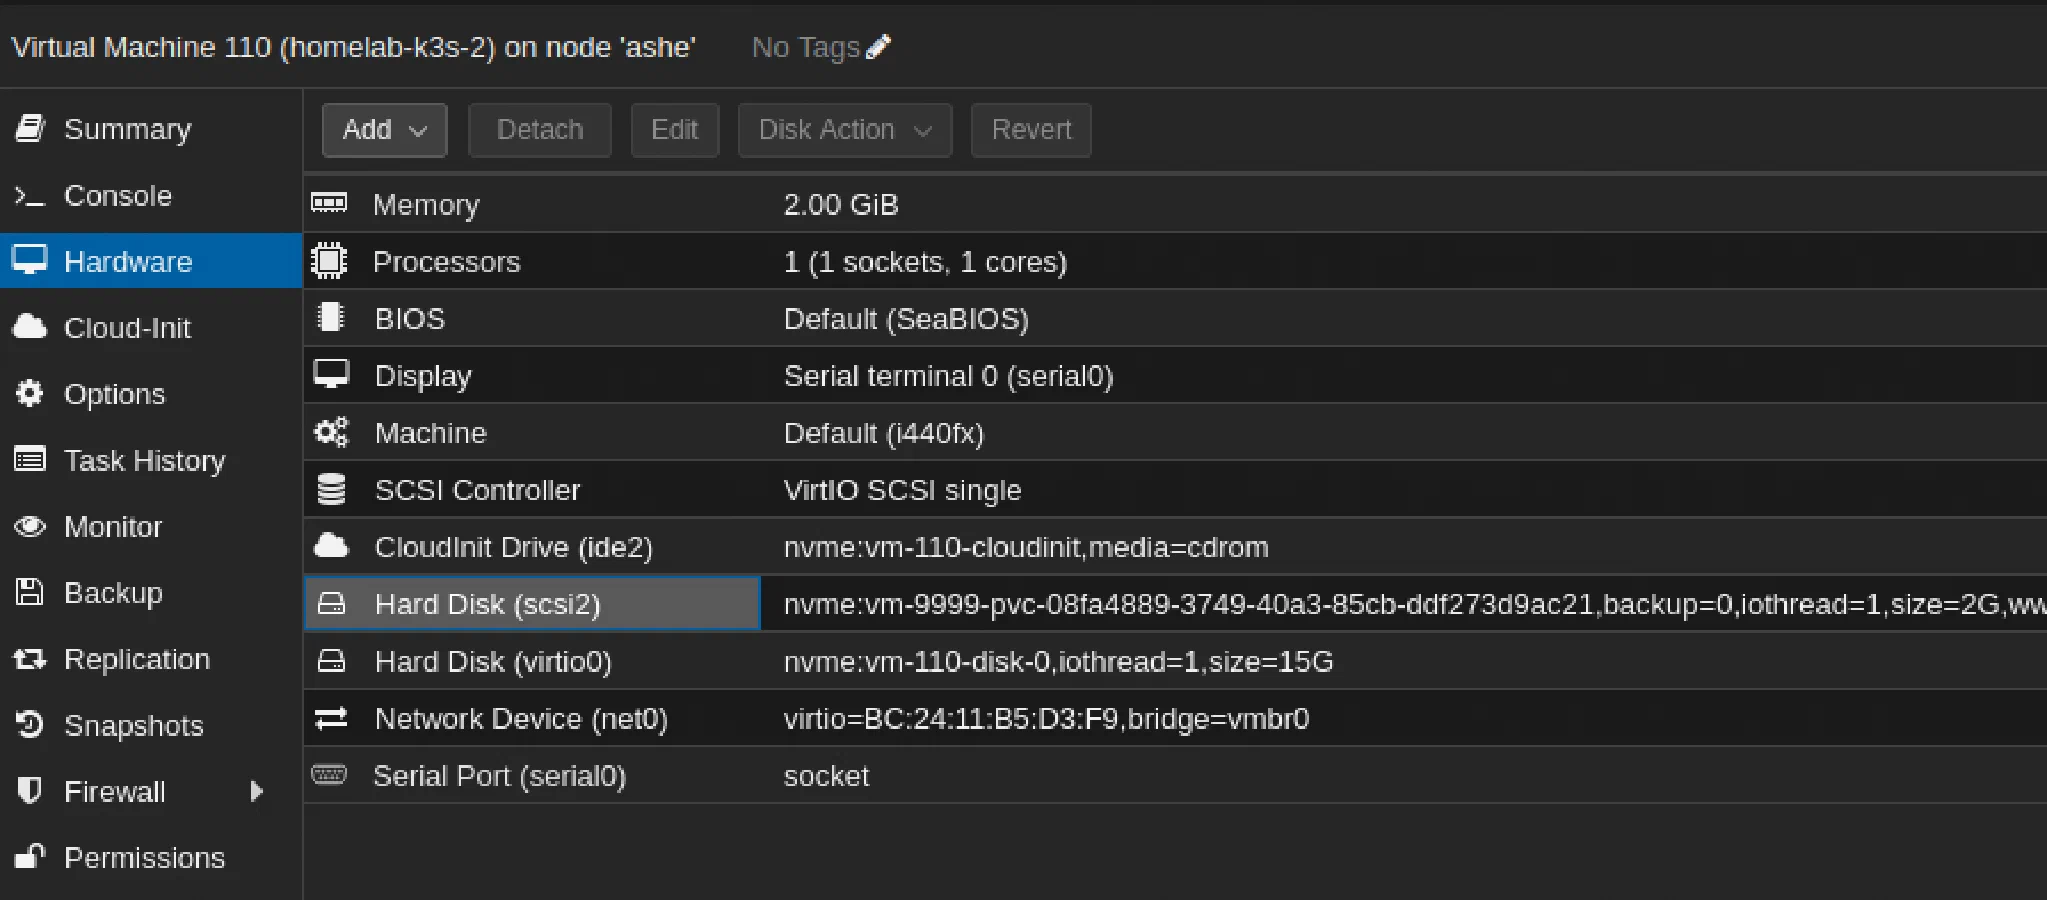
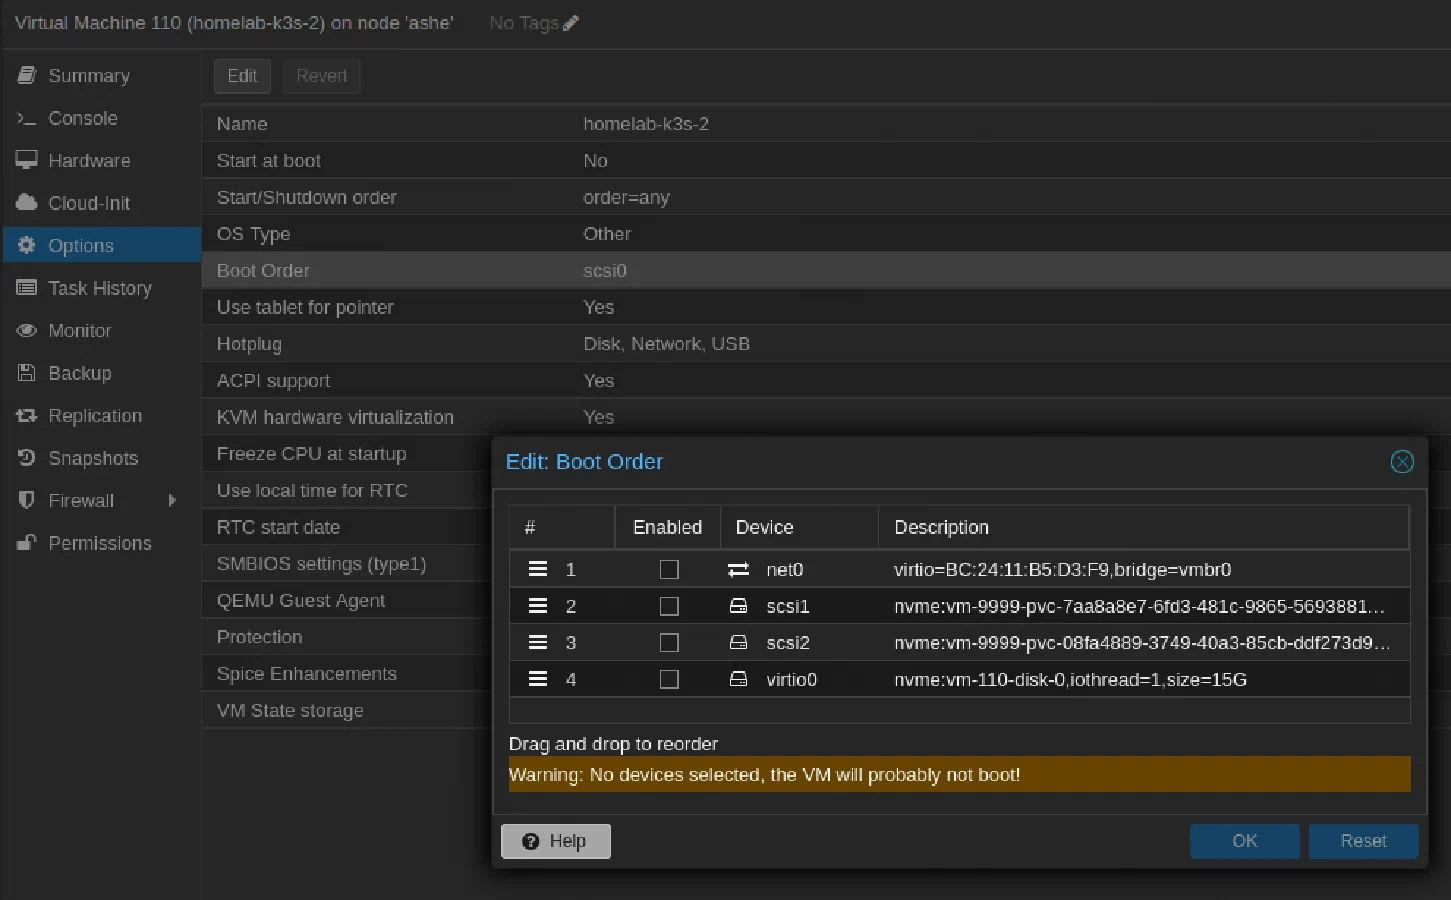
Note: Make sure that after adding new PVC the VM have corrent boot order. In my case it did change, and after a node reboot the VM did not boot from OS disk
Troubleshooting⌗
If you get an error like
Warning FailedScheduling 38s default-scheduler 0/2 nodes are available: 2 node(s) did not have enough free storage. preemption: 0/2 nodes are available: 2 Preemption is not helpful for scheduling.
Make sure that cluster nodes can reach Proxmox WebUI. In my case, the issue was caused by proxmox datacenter-level firewall on a host where I forgot to add a rule which allows access to webui (tcp 8006) from a second internal network.
Cover photo by Maria Teneva on Unsplash